27 KiB
| title | order |
|---|---|
| 如何升级 | 3 |
相较于 v4,G6 v5 的新能力体现在:
- 🎞 视觉与动画规范,使用 JSON spec 或映射函数的方式定义样式与动画;
- 📂信息分层能力;
- 🎨 简单灵活的主题配置能力;
- 🤖 灵活强大的数据处理能力;
- 🎄 树图和图结构的融合;
- 🏀 3D 大图;
- 🚀 性能飞跃,包括渲染与布局计算;
- 🌠 多渲染器,可运行时切换;
- 📦 包体积减少,支持 TreeShaking。
还有其他一些微小而美好的改变:
- 轮廓包裹 Hull 支持文本配置;
- 折线支持自动避障;
- 文本自动适配宽度;
- 采用临时层画布提升交互性能;
- 图例自动从画布中获取样式。
正式版即将来袭。如果上面 Feature 是您所期待的,现在就可以使用 G6 5.0 Beta 版本进行尝鲜!若遇到任何升级问题,请在 GitHub 给我们留言。
为了支持上述全新能力,G6 5.0 相比于 v4 有比较大的 Breaking Change,这可能带来一定的升级成本。希望上面全新能力带来的收益远大于升级成本。
0️⃣. 新功能怎么用
参考 如何使用新功能.
1️⃣. 数据格式变更
为了数据分层,防止数据污染,并更好地避免业务数据和渲染数据混杂的情况,和 v4 相比,v5 的数据结构有了比较大的变更,具体变更如下。G6 v5 提供了 v4 数据的转换处理器,可以在数据处理模块配置使用,例如:
const graph = new Graph({
  transforms: ['transform-v4-data'],
  // ... 其他配置
  data: v4data, // 一份 v4 格式的数据
});
v4 与 v5 的具体数据格式区别如下:
v4 数据结构
type GraphData = {
  nodes: NodeModel[];
  edges: EdgeModel[];
  combos: ComboModel[];
};

type ItemModel = {
  id: string;
  type?: string; // 元素类型,e.g. 如是节点,则可能是 circle, rect 等注册过的节点类型名
  label?: string; // label 的文本
  color?: string; // keyShape 的颜色
  size?: number | number[]; // keyShape 的大小
  visible?: boolean;
  style?: { [shapeAttr: string]: unkown }; // keyShape 的样式
  labelCfg?: {
    position?: string;
    offset: number;
    refX: number;
    refY: number;
    style?: { [shapeAttr: string]: unkown }; // label 的样式
    background?: { [shapeAttr: string]: unkown }; // label 背景的样式
  };
};

type NodeModel = ItemModel & {
  comboId?: string;
  x?: number;
  y?: number;
  anchorPoints?: number[][];
  icon?: {
    show?: boolean;
    img?: string;
    text?: string;
    width?: number;
    height?: number;
    offset?: number;
  };
  linkPoints?: {
    top?: boolean;
    right?: boolean;
    bottom?: boolean;
    left?: boolean;
    size?: number;
    [shapeAttr: string]: unkown;
  };
  // 根据节点类型不同,有不同的图形相关配置,
  // e.g. modelRect 的 preRect, image 的 clipCfg 等
};

type EdgeModel = ItemModel & {
  source: string;
  target: string;
  sourceAnchor?: number;
  targetAnchor?: number;
  controlPoints?: IPoint[]; // polyline 特有
  loopCfg?: LoopConfig; // loop 特有
  curveOffset?: number | number[]; // quadratic/cubic 特有
  minCurveOffset?: number | number[]; // quadratic/cubic 特有
  curvePosition?: number | number[]; // quadratic/cubic 特有
};
v5 数据结构
v5 的节点数据除了 id,边数据除了 id、source、target 这些字段外,所有的内容应当放到 data 对象中:
// v5 用户输入数据格式
type GraphData = {
  nodes: NodeModel[];
  edges: EdgeModel[];
  combos: ComboModel[];
};

type NodeModel = {
  id: string;
  data: {
    type?: string; // 元素类型,e.g. 可能是 circle-node, rect-node
    x?: number;
    y?: number;
    z?: number;
    parentId?: string; // 父 combo 的 id
    label?: string; // label 的文本
    anchorPoints?: number[][];
    badges?: {
      type: 'icon' | 'text';
      text: string;
      position: BadgePosition;
    }[];
    icon?: {
      type: 'icon' | 'text';
      text?: string;
      img?: string;
    };
    [key: string]: unknown; // 其他业务属性
  };
};

type EdgeModel = {
  id: string;
  source: string;
  target: string;
  data: {
    type?: string; // 元素类型,e.g. 可能是 line-edge
    label?: string; // label 的文本
    sourceAnchor?: number;
    targetAnchor?: number;
    icon?: {
      type: 'icon' | 'text';
      text?: string;
      img?: string;
    };
    badge?: {
      type: 'icon' | 'text';
      text: string;
    };
    [key: string]: unknown; // 其他业务属性
  };
};
2️⃣. 数据读取
v4 数据读取
import { Graph } from '@antv/g6';
import data from './data';

const graph = new Graph({
  // ... 配置
});

graph.data(data);
graph.render();
// 或合并上面两行变为:graph.read(data);
v5 数据读取
不再支持 graph.data(data) 和 graph.render(),仍然可以使用 graph.read(data),或将数据直接配置到图上:
import { Graph } from '@antv/g6';
import data from './data';

const graph = new Graph({
  // ... 配置
  data: data,
});
// 或使用:graph.read(data);
图配置中的 data 配置项类型 DataConfig 定义如下:
export type DataConfig =
  | GraphData
  | InlineGraphDataConfig
  | InlineTreeDataConfig
  | FetchDataConfig;

export interface InlineGraphDataConfig {
  type: 'graphData';
  value: GraphData;
}
export interface InlineTreeDataConfig {
  type: 'treeData';
  value: TreeGraphData | TreeGraphData[];
}

export interface FetchDataConfig {
  type: 'fetch';
  value: string;
}
3️⃣. 树图
v5 新增树图相关 feature:
- 布局与 Graph 通用,Graph 可以指定根节点,使用最小生成树建立树结构后使用树图布局算法;
- 交互与 Graph 通用,Graph 也可以展开和收起“子树”了,即无回溯边的下游节点;
- 支持回溯边、环存在;
- 支持森林(多棵树)。
v4 树图的问题
v4 树图有独立的数据结构(TreeGraphData 如下)、图类(TreeGraph)、交互(collapse-expand)、布局(Dendrogram/Indented/Mindmap/CompactBox)。数据结构、布局方法与 Graph 不通用。造成了用户在使用时的理解、转换困难:
-
“怎么绘制多棵树?” - 不支持;
-
“怎么在树图中增加边?” - 树图不允许存在环;
-
“怎么在一般图中使用树图布局?- 布局不通用”。
5.0 将 TreeGraph 和 Graph 进行了全面合并。
// TreeGraph
type TreeGraphData {
  id: string;
  [key: string]: unknown;
  children: TreeGraphData[];
}
- TreeGraph 数据是嵌套的结构,不存在显式的边,父子关系为边;
- TreeGraph 不支持 combo 数据配置;
- 不支持环、森林(多棵树)。
v5 树图
v5 的图支持了 TreeGraph 的数据格式,且原有树图和图的布局、交互都可以通用了。如果需要使用 TreeGraphData,只需要在配置 Graph 时给出一个数据类型的标记:
const graph = new Graph({
  // ... 其他配置项
  data: {
    type: 'treeData', // type 可以是 'graphData'、'treeData'、'fetch',其中 fetch 将在正式版支持
    value: data, // value 在 type 是 treeData 时,可以是 TreeGraphData 或 TreeGraphData[] 以支持森林的绘制
  },
});
在上面「数据读取」小节中介绍了 data 字段的类型,可以直接给 GraphData 类型的数据,那么 G6 将作为普通图处理,并在必要时(如使用树图布局、交互时)生成树图结构。也可以指定 type 为 'treeData' 后给 value 传入 TreeGraphData 类型的数据,那么 G6 将会存储树图结构,并转换为普通图数据进行存储。
也就是说,v5 中不再存在 TreeGraph Class,只有一个 Graph Class。那么 v4 中 TreeGraph Class 特有的 API 可以通过如下方式进行替代:
| 功能 | v4 TreeGraph API | v5 替代方案 |
|---|---|---|
| 在指定的父节点下添加子树 | treeGraph.addChild(data, parent) | graph.addData('node', { id: 'new-child', { parentId: 'parent-node-id' }}) |
| 删除指定的子树 | treeGraph.removeChild(id) | graph.removeData('node', 'id-of-a-node'),若移除的不是叶子节点,则其子节点升级为 roots |
差量更新子树 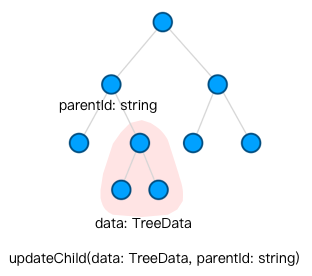 |
treeGraph.updateChild(data, parentId) | graph.updateItem('node', { id: 'id-of-a-node', data: { ... }}) 分别更新每个节点。若需要新增一子节点,addData('node', { id: 'id-of-new-child', { parentId: 'parent-node-id' }}),需要注意顺序,先添加先继后添加后继 |
差量更新子树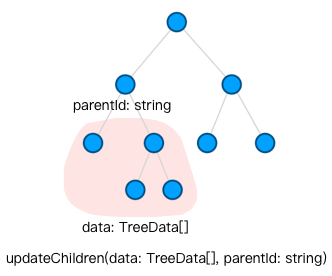 |
treeGraph.updateChildren(data, parentId) | 同上 |
| 更改所属父节点 | 先从原父节点 removeChild,再在新父节点 addChild | graph.updateData('node', { id: 'child-id', { parentId: 'new-parent-id' }}) |
4️⃣. 元素类型名称
v4 中内置的节点类型有 circle、rect、ellipse、star、image 等。这些名称和图形的类型可能产生歧义。因此在 v5 中,将更名为 xx-node。例如 circle-node,rect-node,ellipse-node,star-node,image-node。 同理,边也将更名为 line-edge、polyline-edge、cubci-edge 等。
5️⃣. 功能引入
v4 功能使用
v4 中所有功能都默认已经加入 G6,因此在 graph 配置时可以用字符串的方式指定,这导致了包体积庞大。例如:
import { Graph } from '@antv/g6';
const graph = new Graph({
  // ... 其他配置项
  modes: {
    default: ['drag-node', 'scroll-canvas'], // 交互名称
  },
  defaultNode: {
    type: 'circle', // 节点类型名称
  },
  defaultEdge: {
    type: 'rect', // 节点类型名称
  },
  layout: {
    type: 'radial',
  },
});
v5 功能引入与使用
为了更好地支持 TreeShaking,v5 仅有部分最基础的能力会预先注册,其它已经实现的内置能力,但需要用户手动注册。同样地,自定义的能力也需要同样方式注册:
import { Graph, extend, Extensions } from '@antv/g6';
// 外部引入的功能
import { ForceLayout as ForceLayoutWASM, supportsThreads, initThreads } from '@antv/layout-wasm';

// Class CustomBehaviorClass...
// Class CustomEdge...

const ExtGraph = extend(Graph, {
  behaviors: {
    'activate-relations': Extensions.ActivateRelations, // 内置的交互,未提前注册
    'some-custom-behavior': CustomBehaviorClass, // 自定义交互
  },
  nodes: {
    'modelRect-node': Extensions.ModelRectNode, // 内置的 modelRect 节点,未提前注册
  },
  edges: {
    'custom-edge': CustomEdge, // 自定义边
  },
  layouts: {
    'force-wasm': ForceLayoutWASM,
  },
});

const supported = await supportsThreads();
const threads = await initThreads(supported);
// 使用 extend 后的图进行实例化
const graph = new ExtGraph({
  // ... 其他配置项
  modes: {
    default: [
      'drag-node', // 默认注册的交互
      'activate-relations', // 刚刚引入并注册的内置交互
      'some-custom-behavior', // 自定义并注册的交互
    ],
  },
  defaultNode: {
    type: 'modelRect-node', // 刚刚引入并注册的内置节点类型
  },
  defaultEdge: {
    type: 'custom-edge', // 自定义并注册的边类型
  },
  layout: {
    type: 'force-wasm', // 刚刚从其他包引入并注册的布局算法
    threads,
    maxIteration: 200,
  },
});
6️⃣. 布局使用
我们重构了 @antv/layout,考虑到包体积大小仅内置了 circular / concentric / grid / force 布局。在使用方式上和 v4 完全一致,通过 type 指定布局名称,传入其他布局参数:
new Graph({
  //...其他配置项
  layout: {
    type: 'force', // 布局名称
    preventOverlap: true,
    nodeSize: 30,
    workerEnabled: true, // 支持在 WebWorker 中运行
  },
});
对于非内置布局,我们提供了以下使用方式:
- @antv/layout 和 v4 保持一致的 JS 编写的串行布局算法;
- @antv/layout-wasm 提供基于 Rust 绑定到 WASM、多 WebWorker 并行的布局算法;
- @antv/layout-gpu 提供基于 WebGPU 的可并行布局算法;
- 用户完全自定义的布局。
相比 v4 多出了向 G6 运行时标准库注册布局这一步。另外,虽然由于实现不同有的需要额外的异步启动步骤,但是在 layout 的配置描述上均保持一致,即通过 type 指定布局名称,然后传入其他布局参数。
下面展示的是在 v5 中使用新增的 @antv/layout-wasm,首先需要向 G6 的运行时标准库注册,提供一个自定义布局名称,后续将它传给 layout 使用。
import { stdLib, Graph } from '@antv/g6';
import { supportsThreads, initThreads, ForceLayout as ForceLayoutWASM } from '@antv/layout-wasm';

// 注册自定义布局
const ExtGraph = extend(Graph, {
  layouts: {
    'force-wasm': ForceLayoutWASM,
  },
});

// 启动 WebWorker 线程池
const supported = await supportsThreads();
const threads = await initThreads(supported);

// 使用扩展后的 Graph
new ExtGraph({
  //... 省略其他配置
  layout: {
    type: 'force-wasm', // 与注册时命名一致
    threads, // 线程配置
    dimensions: 2,
    maxIteration: 100,
    //... 省略该布局的其他参数
  },
});
如果我们提供的布局实现都无法满足需求,还可以完全自定义布局。在实现 @antv/layout 提供的 Layout 接口时,只需要实现 execute 方法,assign 置空即可,这样可以保证不影响原始的图模型数据。
import { Layout, LayoutMapping } from '@antv/layout';

class MyCustomLayout implements Layout<{}> {
  async assign(graph, options?: {}): Promise<void> {
    throw new Error('Method not implemented.');
  }
  async execute(graph, options?: {}): Promise<LayoutMapping> {
    const nodes = graph.getAllNodes();
    return {
      nodes: nodes.map((node) => ({
        id: node.id,
        data: {
          x: 0,
          y: 0,
        },
      })),
      edges: [],
    };
  }
  options: {};
  id: 'myCustomLayout';
}
// 注册自定义布局
const ExtGraph = extend(Graph, {
  layouts: {
    myCustomLayout: MyCustomLayout,
  },
});

// 使用扩展后的 Graph
new ExtGraph({
  layout: {
    type: 'myCustomLayout',
  },
});
7️⃣. 节点/边/ combo 实例
G6 v4 向用户暴露了节点和边的 item 实例,但它们的大部分 API,Graph 都有覆盖。而我们更推荐使用 Graph 的 API,以方便多个相关节点和边之间的统一管理和联动。因此,我们在 v5 中不再暴露节点和边的 item,所以 API 收口在 Graph 上,可以通过 Graph 获得单个/多个节点/边的数据,但不能够得到 item。
v4 使用 item 的情况
// 获取图上所有元素实例
graph.getNodes();
graph.getEdges();
graph.getCombos();

// 监听中的元素对象
graph.on('node:click', (e) => {
  const { item } = e; // item 即为被点击的元素实例
  const itemType = item.getType(); // 获取元素类型
});

// 获得实例中的数据
item.getModel();
// 更新实例的数据
graph.updateItem(item, {
  // 数据
});
// 增加节点/边/combo
graph.addItem('node', {
  // ...数据
});
// 删除节点/边/combo
graph.removeItem(item);
v5 替代 API
// 获取图上所有元素的数据 (内部流转数据)
graph.getAllNodesData();
graph.getAllEdgesData();
graph.getAllCombosData();

// 监听
graph.on('node:click', (e) => {
  // 被点击的元素类型,元素 id
  const { itemType, itemId } = e;
});

// 获取单个元素数据 (内部流转数据)
graph.getNodeData(id);
graph.getEdgeData(id);
graph.getComboData(id);

// 更新单个/多个实例数据
graph.updateData('node', [nodeModel1, nodeModel2]);
// 增加单个/多个实例数据
graph.removeData('node', [nodeModel1, nodeModel2]);
// 删除单个/多个实例数据
graph.removeData('node', [id1, id2]);
8️⃣. 样式配置
v4 由于没有数据分层,详细的图形样式可以配置在数据中,也可以配置在 graph 的 defaultNode defaultEdge 配置项中。导致用户对数据的管理略有混乱。业务属性和样式配置可能混杂在一起。另外,v4 graph 的节点/边样式配置是静态的、全局的,不能根据不同数据做出不同的映射。
v4 全局样式配置
const graph = new Graph({
  // ...其他配置
  defaultNode: {
    type: 'circle',
    style: {
      fill: '#f00',
      r: 20,
    },
  },
  defaultEdge: {
    type: 'poliline',
    style: {
      stroke: '#0f0',
      lineWidth: 2,
    },
  },
});
v5 样式映射
在 v5 中我们更建议用户数据中仅保留必要的业务属性,以及重要的简单样式配置(例如文本内容、badges 内容等),把样式配置放在图的节点/边 mapper 中。Mapper 是 v5 将内部流转数据转换为渲染数据的映射器,由用户配置在 Graph JSON 配置中。当然,也有部分内置的 mapper 逻辑,用于将用户数据中的文本内容、badges 内容等转换到对应的图形属性上。
const graph = new Graph({
  // ...其他配置
  node: nodeInnerModel => {
    const { id, data } = nodeInnerModel;
    // 返回值类型见下方 DisplayNodeModel 类型
    return {
      id,
      data: {
        ...data,
        keyShape: {
          fill: data.important ? '#f00' : '#ccc',
          r: 20
        },
        labelShape: {
          text: data.label,
          position: 'bottom'
        },
      }
    }
  },
  // 边配置同理
  edge: edgeInnerModel => {
    // 返回值类型见下方 DisplayEdgeModel 类型
    return {...}
  }
});

// 样式配置返回的内容
type DisplayNodeModel = NodeModel & {
  id: string;
  type?: string; // 元素类型,e.g. 可能是 circle-node, rect-node
  data: {
    x?: number;
    y?: number;
    z?: number;
    keyShape?: { [shapeAttr: string]: unkown }, // keyShape 的样式
    // label 的配置和样式。未配置则无该图形
    labelShape?: {
      position?: string,
      offsetX?: number,
      offsetY?: number,
      offsetZ?: number;
      [shapeAttr: string]: unkown
    },
    labelBackground?: { [shapeAttr: string]: unkown }, // label 背景的样式。未配置则无该图形
    iconShape?: { [shapeAttr: string]: unkown }, // icon 的样式。未配置则无该图形
    badgeShapes?: {
      // 所有 badge 图形的通用样式。未配置则无该图形
      color?: string;
      textColor?: string;
      [shapeAttr: string]: unkown;
      // 各个 badge 分别的样式和配置
      [key: number]: {
        position?: IBadgePosition;
        color?: string;
        textColor?: string;
        [shapeAttr: string]: unkown;
      };
    };
    anchorShapes?: {
      // 所有 anchor 图形的通用样式。未配置则无该图形
      color?: string;
      textColor?: string;
      size?: number;
      offsetX?: number;
      offsetY?: number;
      offsetZ?: number;
      [shapeAttr: string]: unkown;
      // 各个 anchor 分别的样式和配置
      [key: number]: {
        position?: BadgePosition;
        color?: string;
        textColor?: string;
        size?: number;
        offsetX?: number;
        offsetY?: number;
        offsetZ?: number;
      	[shapeAttr: string]: unkown;
      };
    };
  }
}

type DisplayEdgeModel = {
  id: string;
  source: string,
  target: string,
  data: {
    type?: string, // 元素类型,e.g. 可能是 line-edge
    sourceAnchor?: number,
    targetAnchor?: number,

  }
}
9️⃣. 事件与事件参数
v4 中 mousexx 事件,在 v5 中更改为 pointerxx 事件,能更好地兼容移动端事件,如下:
// v4
graph.on('node:mousemove', (e) => {});
// v5
graph.on('node:pointermove', (e) => {});

// 其他类似事件名:
// mousemove -> pointermove
// mouseenter -> pointerenter
// mouseleave -> pointerleave
// mousedown -> pointerdown
// mouseup -> pointerup
v4 事件参数
type GraphEvent = {
  item: Node | Edge | Combo;
  target: Shape;
  x: number;
  y: number;
  pointX: number;
  pointY: number;
  canvasX: number;
  canvasY: number;
  clientX: number;
  clientY: number;
  //... 其他
};
v5 事件参数
v5 不再暴露元素,item 将不再存在于事件参数中,v5 事件参数如下:
type GraphEvent = {
  itemId: string | number;
  itemType: 'node' | 'edge' | 'combo';
  target: Shape;
  // 四套坐标系下当前操作的坐标值
  canvas: { x: number; y: number; z: number }; // 对应 v4 的 x y 或 pointerX pointerY,图形的绘制坐标
  client: { x: number; y: number }; // 对应 v4 的 clientX clientY,相对于浏览器的坐标系
  viewport: { x: number; y: number }; // 对应 v4 的 canvasX canvasY,相对于 Canvas DOM 的坐标系
  screen: { x: number; y: number }; // 相对于整个屏幕的坐标系
  //... 其他
};
🔟. 坐标系统
v4 坐标系统
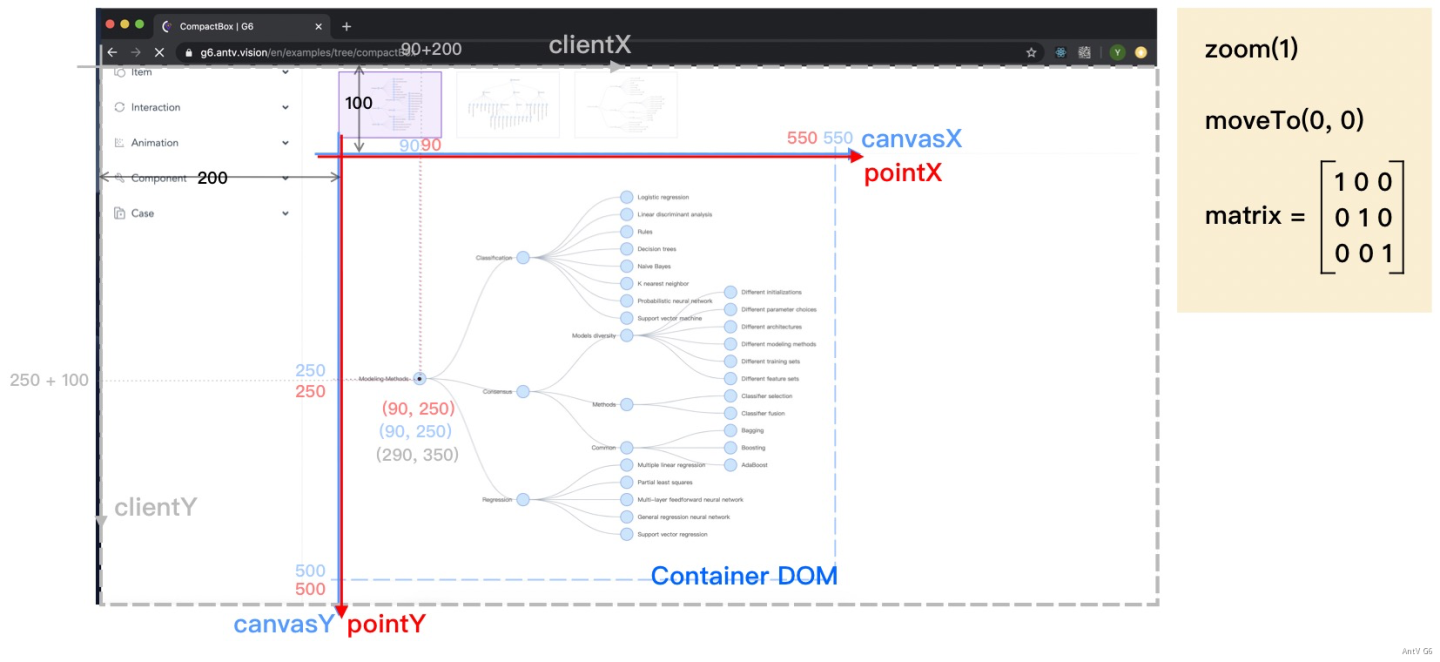
v4 的坐标系统(三套)见文档:https://g6.antv.antgroup.com/manual/advanced/coordinate-system
- v4 - clientX clientY 相对于浏览器的坐标系
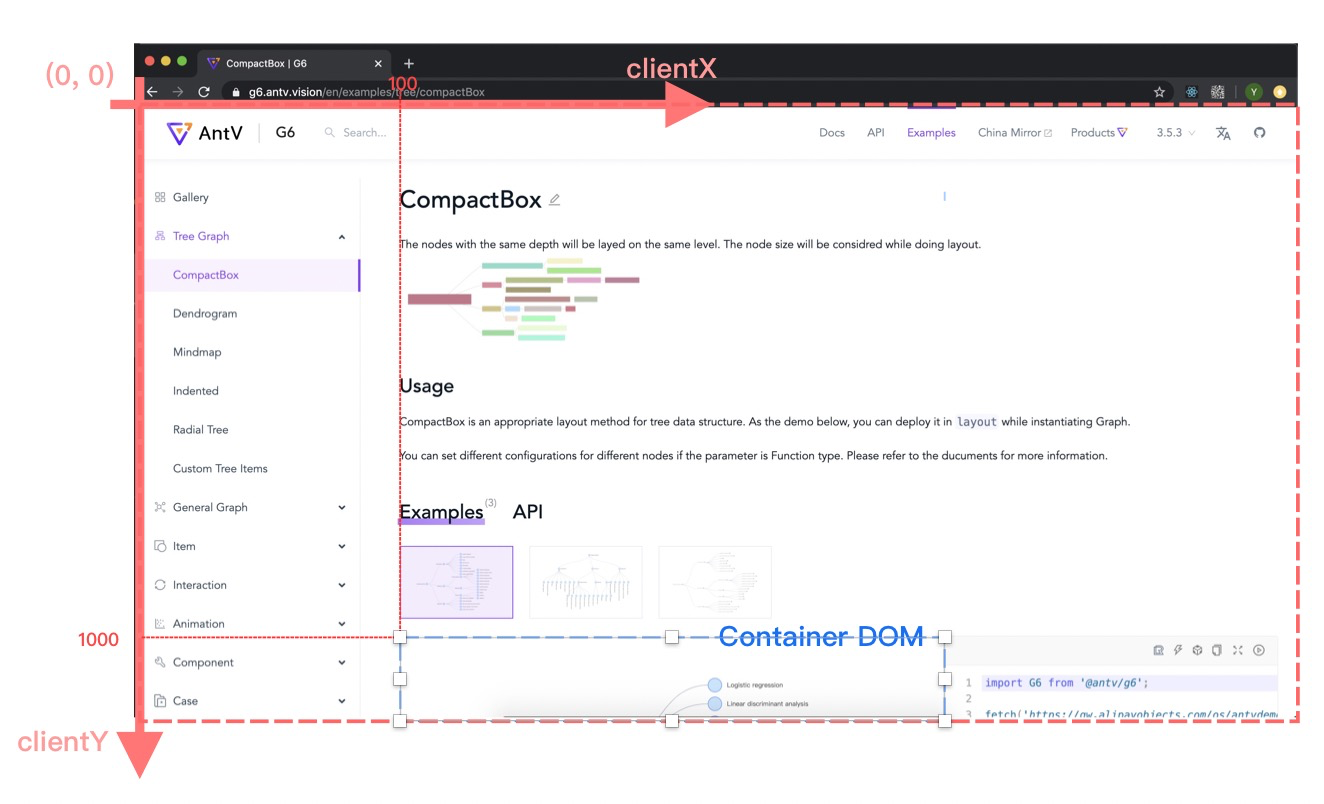
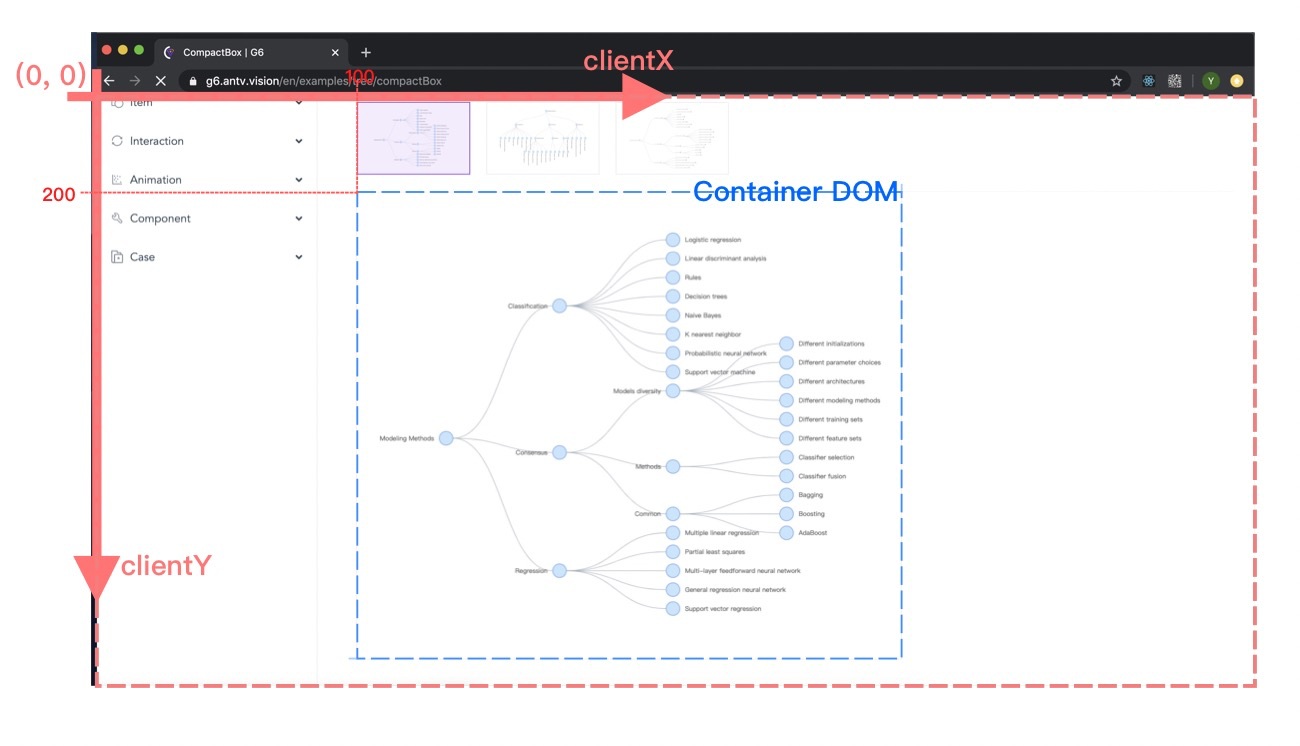
- v4 - canvasX canvasY 相对于 canvas DOM 的坐标系
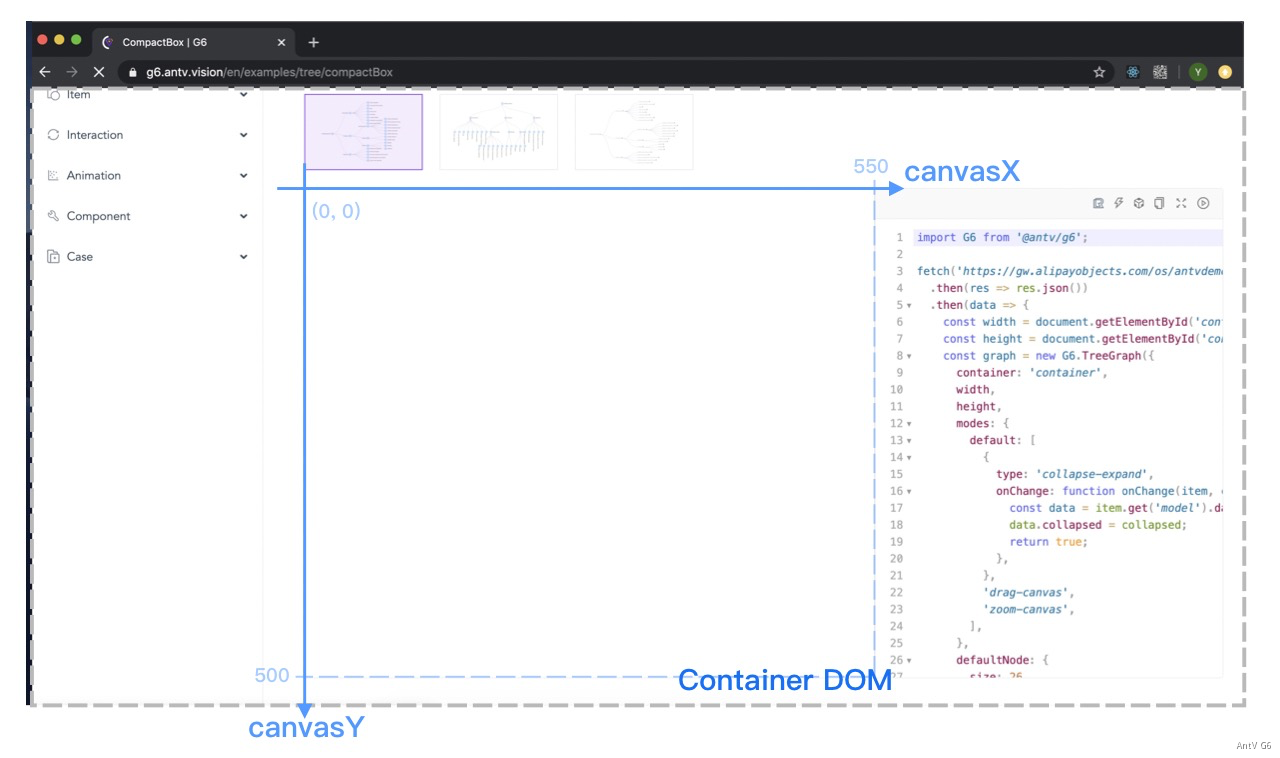
- v4 - pointX pointY (= v4 事件中的 x y) 图形绘制坐标系
v5 坐标系
需要注意的是,v5 中的坐标系(四套)命名有所不同。
| 含义 | v4 坐标名 | v5 坐标名 |
|---|---|---|
| 图形的绘制坐标 | { x, y } 或 { pointerX, pointerY } | canvas: { x: number; y: number; z: number } |
| 相对于浏览器的坐标系 | { clientX, clientY } | client: { x: number; y: number; z: number } |
| 相对于 Canvas DOM 的坐标系 | { canvasX, canvasY } | viewport: { x: number; y: number; z: number } |
相对于整个屏幕的坐标系 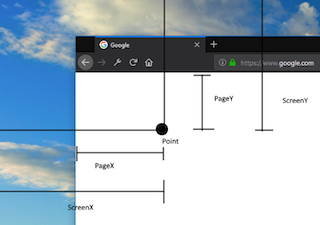 |
无 | screen: { x: number; y: number; z: number } |
🌸. 其他微小而美好的改变
- 轮廓包裹 Hull 支持文本配置:
只需要为 Hull 实例配置 labelShape 即可,可以指定其相对位置(position)在 hull 的上、下、左、右四个方向。

- 折线支持自动避障:
设置边的 keyShape.routeCfg.enableObstacleAvoidance: true 即可自动躲避节点。

- 文本自动适配宽度:
设置节点文本图形的 maxWidth,可以为数字代表允许的最大宽度的像素值,也可以是百分比字符串代表占 keyShape 的比例。例如:
const graph = new Graph({
  node: {
    labelShape: {
      maxWidth: '120%',
    },
  },
});

- 采用临时层画布提升交互性能:

- 图例自动从画布中获取样式:
